DexScreener Enhanced Token Info: How to Get It (2026)
How to get DexScreener Enhanced Token Info for your Solana token — paid path, manual review, metadata fields, and rejection reasons.
DexScreener's Enhanced Token Info block — the logo, description, and social links that appear on your pair page — is populated from your Metaplex on-chain metadata, not from a DexScreener profile you fill out separately. There are two ways to get it: let DexScreener's crawler find your metadata organically (free, may take minutes to hours), or submit DexScreener's paid Update Token Info form (approximately $300 in SOL at time of writing, though the fee changes — confirm on the site before paying). Both paths require a live pool with enough TVL for DexScreener to index, and both read the same 6 Metaplex fields. Get those fields right on-chain first; the DexScreener display follows.
TL;DR by the numbers
| Spec | Value |
|---|---|
| What it is | Logo + description + socials block on your DexScreener pair page |
| Organic trigger | DexScreener crawler reads your Metaplex metadata after pool creation |
| Paid path cost | ~$300 in SOL (observed — not a published fixed fee; verify on dexscreener.com) |
| Metadata fields required | 6: name, symbol, image, description, external_url, extensions |
| Indexing lag | Minutes typical; up to 30 min observed (no published SLA) |
| Pool TVL floor | ~$500 observed before DexScreener indexes the pair (not officially published) |
Across our 47 token launches (12 paid client engagements), metadata-incomplete display came up in roughly 1 in 3 first post-launch check-ins. Founders had the pool up and the token trading, but DexScreener was showing a blank pair card — no logo, no name, no links. Every single time the root cause was on-chain metadata, not DexScreener's indexer. Fix the metadata, and DexScreener catches up.
What 'Enhanced Token Info' on DexScreener Actually Shows
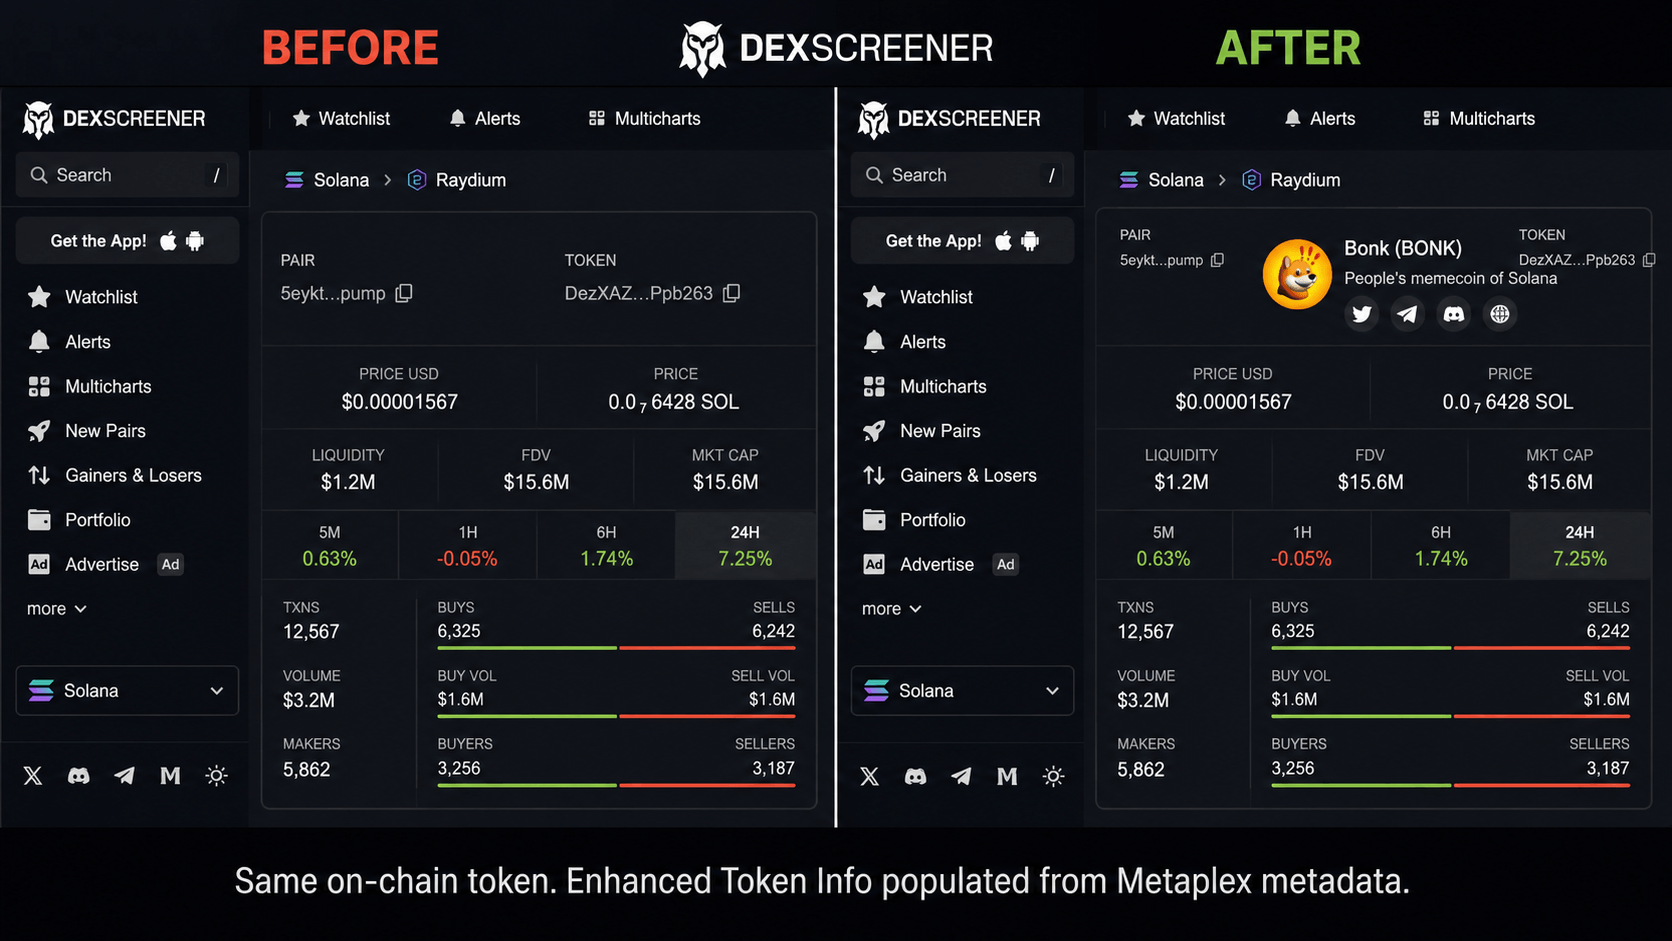
Open any well-known Solana token on DexScreener — BONK's pair page is a clean example. At the top of the pair card you'll see a logo, the token name, the ticker symbol, a short description, and icon links to Twitter, Telegram, Discord, and the project website. That block is the Enhanced Token Info.
It renders from 6 fields in the Metaplex Token Metadata standard. The Metaplex Token Metadata program (metaqbxxUerdq28cj1RbAWkYQm3ybzjb6a8bt518x1s) stores a metadata PDA account that's derived from your mint address. DexScreener's crawler resolves the URI stored in that PDA, fetches the JSON off-chain, and maps the fields to its display layer.
The 6 fields DexScreener reads:
| Metaplex field | What DexScreener shows | Notes |
|---|---|---|
name | Token name in the pair header | Max ~32 chars on-chain; DexScreener truncates beyond that |
symbol | Ticker symbol | Max ~10 chars |
image | Token logo | PNG or SVG, under 1 MB, square recommended |
description | Short description under the logo | ~200 char observed limit — longer text gets cut |
external_url | Clickable website icon | Must be a direct HTTPS URL, no redirects |
extensions | Social icon links | Sub-fields: twitter, telegram, discord, website |
The extensions object is a JSON sub-object — it looks like this in your metadata JSON:
{
  "extensions": {
    "twitter": "https://twitter.com/yourtoken",
    "telegram": "https://t.me/yourtoken",
    "discord": "https://discord.gg/yourtoken",
    "website": "https://yourtoken.io"
  }
}
One distinction worth making: Enhanced Token Info is not a "verified" badge. DexScreener does not audit the project, review the smart contract, or endorse the team. It means the indexer found resolvable metadata and rendered it. BONK (Solscan, 100T supply at 5 decimals) and WIF (Solscan, 1B supply at 6 decimals) both have fully populated Enhanced blocks — but they earned those through broad market adoption and verified metadata, not because DexScreener certified them. Your token gets the same display when your metadata is complete. That's all.
The Metaplex token-metadata layer sits between your mint account and what DexScreener can show. For a full breakdown of how the PDA is derived and what each field controls, the Metaplex Token Metadata explainer covers it. The short version: DexScreener cannot display what isn't in the on-chain account. Fix the source, not the symptom.
Metaplex Metadata PDA → off-chain JSON (IPFS/Arweave) → DexScreener crawler → pair page display

  On-chain PDA (metaqbxxUerdq28cj1RbAWkYQm3ybzjb6a8bt518x1s):
  ┌─────────────────────────────────────┐
  │  name:          "MYTOKEN"           │
  │  symbol:        "MTK"               │
  │  uri:  "https://ipfs.io/ipfs/..."   │ ← resolves to off-chain JSON
  └─────────────────────────────────────┘
              │
              ▼
  Off-chain JSON (IPFS / Arweave / your server):
  ┌─────────────────────────────────────┐
  │  image:       "https://..."         │
  │  description: "..."                 │
  │  external_url:"https://..."         │
  │  extensions:  { twitter, telegram,  │
  │                 discord, website }  │
  └─────────────────────────────────────┘
              │
              ▼
  DexScreener pair page: logo + name + description + social icons
Two Paths to Get Enhanced Token Info
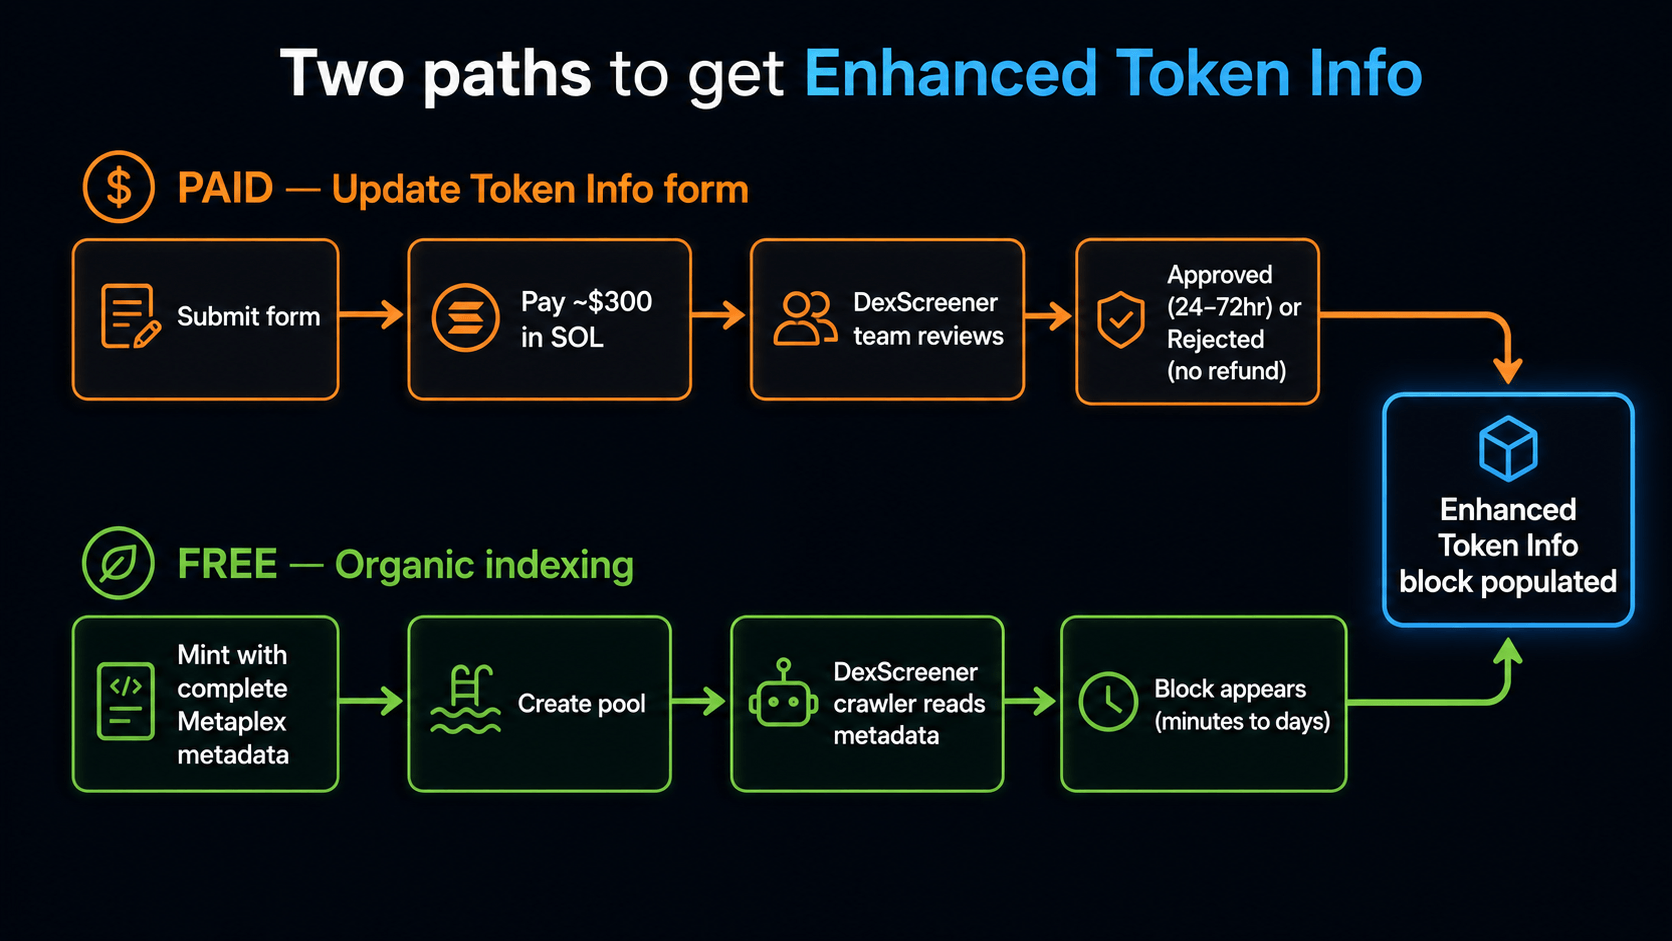
There are exactly two mechanisms that result in Enhanced Token Info appearing on your pair page. They are not exclusive — you can use one and fall back to the other. But they have meaningfully different costs, timelines, and failure modes.
| Organic indexing | Paid Update Token Info | |
|---|---|---|
| Cost | Free | ~$300 in SOL (verify on dexscreener.com — price varies) |
| Trigger | DexScreener crawler detects new pool + reads Metaplex metadata | You submit the Update Token Info form; DexScreener's team reviews manually |
| Timeline | Minutes to 30 min post-pool (observed; no published SLA) | Hours to days — manual review queue |
| Requires on-chain metadata? | Yes — crawler reads your Metaplex PDA | Yes — metadata must still be on-chain and resolvable |
| Rejection risk | Crawler silently fails if metadata is broken | Form is rejected; fee is non-refundable |
| Best for | Tokens with solid metadata from day one | Tokens that launched metadata-incomplete and need a bump |
Path 1 — Organic indexing. When you create a trading pool on Raydium or another DEX, DexScreener picks up the new pair, fetches your Metaplex metadata URI, and renders what it finds. This happens automatically — you don't submit anything. The pool must hit DexScreener's observed TVL indexing floor of approximately $500 for the pair to appear at all. Below that threshold, the pair page may not exist yet. Solana finality is 1-2 seconds, so the pool itself is on-chain almost immediately; the DexScreener indexing lag on top of that runs minutes to 30 minutes in our observation.
Before you create that pool, have all 6 metadata fields in order. If you launch with a broken image URI or an empty description, the pair page shows up blank and you're scrambling for a fix post-launch. The cleaner path is to use alchemii's token creator to set metadata during the creation step, before you ever open a pool.
If your metadata needs post-launch corrections, the can you edit a Solana token after launch guide covers the update flow and the constraint that you need an active update authority to change anything.
Path 2 — Paid Update Token Info. DexScreener's Update Token Info form lets you submit your token's details directly to their team for manual review. The current fee is approximately $300 in SOL — but DexScreener does not publish a fixed price and the amount has changed before. Go to your pair page on dexscreener.com, find the "Update Token Info" option, and read the current fee before paying.
The fee is non-refundable on rejection. That's not a complaint about DexScreener's policy — it's just a real cost to factor in. Check every field twice before you hit submit.
I paid the $300 once on a launch where I was 90% sure the metadata was clean and 10% sure I was about to set $300 on fire. The submission went through in 90 minutes. The 10% panic was actually useful — it made me re-read every field one more time the morning after I paid, before the review window. I caught a typo in the description and an extra space in the website URL while waiting. Two trivial fixes that almost cost a resubmission. The "I just paid" mindset is the right diligence mindset.
The paid path does not bypass the on-chain metadata requirement. DexScreener still reads your Metaplex PDA after you submit. The form is a way to get into the manual review queue faster, not a way to skip proper metadata setup.
Prerequisites for either path:
- A live trading pool (Raydium AMM v4 is the most common — use alchemii's LP creation tool to set one up). If you're still pre-launch, create the SPL token first — pool comes after mint.
- Metaplex metadata on-chain with a resolvable URI pointing to valid off-chain JSON.
- An image file under 1 MB, reachable at a stable URL (IPFS via Pinata is the standard approach — not your local server, not a temporary hosting URL).
- Your deployer wallet still holds update authority for the metadata — otherwise no on-chain metadata changes are possible.
After you burn your LP tokens, also check that your metadata URI is still resolving. LP burns touch pool accounts, not metadata accounts — but it's a good time to audit the full state of your on-chain data before announcing anywhere.
Step-by-Step: Update Your Token Info as the Deployer
This walkthrough assumes you are the deployer wallet and still hold the update authority for the Metaplex metadata account. If update authority was revoked, you cannot change on-chain metadata — full stop. Check that first.
The Metaplex update authority instruction writes new values to the metadata PDA. The program ID is metaqbxxUerdq28cj1RbAWkYQm3ybzjb6a8bt518x1s and the SPL Token Program it interacts with is TokenkegQfeZyiNwAJbNbGKPFXCWuBvf9Ss623VQ5DA. You don't need to call these directly — a no-code tool handles the signing — but knowing they exist helps you verify on Solscan after the fact.
DexScreener Enhanced Token Info launch checklist
Pre-flight (complete before touching DexScreener's form)
- Confirm update authority is active. On Solscan, look up your mint address, go to the Metadata tab, and verify the "Update Authority" field shows your deployer wallet address — not
nulland not a third-party address you don't control. - Prepare your image file. PNG or SVG, square aspect ratio (1:1), under 1 MB. Transparency in PNG is fine. Do not use a JPEG — edge rendering is noticeably worse.
- Upload image to IPFS. Use Pinata or another permanent IPFS host. Copy the IPFS gateway URL (format:
https://ipfs.io/ipfs/<CID>/image.png). Test the URL in an incognito browser tab to confirm it resolves. - Write your off-chain metadata JSON. Structure:
{
  "name": "YOUR TOKEN NAME",
  "symbol": "TKR",
  "image": "https://ipfs.io/ipfs/<CID>/image.png",
  "description": "Under 200 characters. Direct. No hype. What the token is.",
  "external_url": "https://yourproject.io",
  "extensions": {
    "twitter": "https://twitter.com/yourtoken",
    "telegram": "https://t.me/yourtoken",
    "discord": "https://discord.gg/yourtoken",
    "website": "https://yourproject.io"
  }
}
- Upload the JSON to IPFS. Same process as the image. Get the JSON's IPFS gateway URL.
- Test all links. Open every URL in your
extensionsobject in a browser. Confirm each resolves to the correct page, not a redirect chain or a parked domain. - Count your description characters. The observed DexScreener limit is approximately 200 characters. DexScreener does not publish this limit — it's observed behavior. Count in a character counter before uploading.
On-chain update
- Open your token in alchemii (or use the Metaplex JS SDK / CLI if you're comfortable with it — the instruction is
UpdateMetadataAccountV2). - Paste the IPFS JSON URI into the metadata URI field. Sign the transaction with your deployer wallet. Solana finality: 1-2 seconds.
- Verify on Solscan. Go to your mint on Solscan, Metadata tab. The URI field should now show your new IPFS link. Click the URI to confirm it loads the correct JSON in your browser.
- Cross-check the image. Click through to the image URL inside the JSON. Confirm it loads the PNG — not a 404, not a gateway timeout.
DexScreener submission (paid path only)
- Navigate to your pair page on dexscreener.com. Confirm the pair exists and is live. If the pair card shows "no data" or the page 404s, your pool TVL may be under the ~$500 indexing floor — add more liquidity first.
- Find "Update Token Info" in the pair page controls. Note the current fee in SOL. Verify it matches what you expected. Do not proceed if the fee is different from what you budgeted — confirm the amount before signing.
- Fill every field in the form. Copy from your JSON; do not retype from memory.
- Submit and sign. The fee transaction fires on submit.
- Save the submission confirmation. If DexScreener provides a submission ID or confirmation screen, screenshot it. Rejection disputes without a confirmation reference go nowhere.
After submission
- Wait for organic indexing first (if you went the organic path). Check your DexScreener pair page 30 minutes after your metadata update. If the Enhanced block populated, you're done.
- Check the pair link for share. The full state of your token's trust signals — LP status, authority revocations, and metadata completeness — is worth packaging into a single post. The Solana LP burn proof guide covers what to include when you announce.
- Confirm Enhanced block renders correctly. Logo loads. Description is legible and under the character limit. All 4 social icons link to the right destinations.
For context on what a complete trust-signal audit looks like — mint authority, freeze authority, metadata mutability, LP burn status, and deployer wallet activity — the how to verify a Solana token guide runs the full five-checkpoint flow. DexScreener's Enhanced block covers exactly one of those five checkpoints: metadata completeness.
Why Submissions Fail: Common Rejection Patterns
Most Update Token Info rejections come down to 4 failure patterns. All of them are fixable before you submit — which is why the checklist above exists.
| Rejection pattern | Root cause | Fix |
|---|---|---|
| Image URI unreachable | IPFS gateway timeout or dead URL at review time | Use Pinata dedicated gateway; test the URL from multiple networks |
| Image over 1 MB | PNG not compressed or contains unnecessary metadata | Run through an image optimizer; target under 500 KB for safety |
| Description too long | Over ~200 observed character limit | Count characters before uploading; cut to 180 to have margin |
| Social links are redirects | Twitter's t.co shortener or a link-in-bio tool in the URL chain | Use direct profile URLs: https://twitter.com/handle, not a redirect |
| Pool TVL under ~$500 | DexScreener hasn't indexed the pair yet | Add more liquidity; wait for pair to appear before submitting |
| Metadata URI not resolving | Broken URI on-chain or gateway is down at review time | Upload to multiple IPFS gateways; verify URI in Metadata tab on Solscan |
| Name / symbol mismatch | On-chain name/symbol differ from what's in the JSON | Make them identical — DexScreener cross-references both |
The image URI problem is the most common one. Public IPFS gateways (ipfs.io) are inconsistent. If DexScreener's crawler hits the gateway at a moment when it's slow or timing out, the image fails to load at review time and the submission gets rejected — even though the image itself is fine. Pinata's dedicated gateway (gateway.pinata.cloud) is more reliable for this reason. A rejected submission is a non-refundable ~$300 loss. Spend 5 minutes confirming the image URL loads reliably before paying.
The social link redirect issue trips up a lot of people using link-in-bio tools. If your "twitter" field is https://linktr.ee/yourtoken and Linktree then redirects to your Twitter, DexScreener's checker may flag the redirect chain. Use the direct URL.
One honest failure from our side: on a launch in early 2025, we submitted with a description that read fine on desktop but had a hidden Unicode whitespace character that pushed the character count over the limit. The submission was rejected and the resubmission took 3 days. Now we paste descriptions into a plain-text counter and check byte length, not just character count.
flowchart TD
    A[Pool created and live] --> B{TVL above ~$500?}
    B -->|No| C[Add more liquidity first]
    C --> B
    B -->|Yes| D[Check Metaplex metadata URI on Solscan]
    D --> E{URI resolves to valid JSON?}
    E -->|No| F[Fix on-chain metadata URI]
    F --> D
    E -->|Yes| G{Image under 1 MB and reachable?}
    G -->|No| H[Compress image / re-upload to IPFS]
    H --> G
    G -->|Yes| I{Description under ~200 chars?}
    I -->|No| J[Shorten description]
    J --> I
    I -->|Yes| K{Social links direct URLs?}
    K -->|No| L[Replace redirect links with direct URLs]
    L --> K
    K -->|Yes| M[Wait for organic indexing OR submit paid form]
    M --> N{Enhanced block visible on DexScreener?}
    N -->|Yes| O[Done — share via burn proof post]
    N -->|No, 30+ min elapsed| P[Check DexScreener pair page — use paid Update Token Info]
The jupiter strict-list explained post is worth reading alongside this one — Jupiter's strict list and DexScreener's Enhanced block are two different indexers reading overlapping metadata. Getting your Metaplex data right fixes both at once. The get your Solana token listed on Phantom guide is a third parallel: same metadata, third indexer.
Metadata completeness is one signal in a broader trust stack. The other signals — mint authority revocation, freeze authority revocation, LP burn status — are covered in the how to verify a Solana token guide and in the broader burn wallet verification post published the same week as this article.
Caveats
- The ~$300 paid submission fee is observed, not published. DexScreener does not list a fixed price for Update Token Info. The figure used here was observed in May 2026 across multiple submissions in our network. It has changed before and may change again. Verify on dexscreener.com before paying.
- The ~$500 TVL indexing floor is inferred, not documented. DexScreener does not publish a minimum TVL threshold for pair indexing. The ~$500 figure comes from our observation that pools below this level frequently do not appear on DexScreener. The actual threshold may differ for your token or pair type.
- DexScreener indexing lag has no published SLA. "Minutes to 30 minutes" is an observed range across our 47 launches. DexScreener's actual indexing schedule is not public. Plan messaging for 60 minutes post-metadata-update to be safe.
- Enhanced Token Info is a display signal, not a trust seal. A fully populated Enhanced block does not mean the token is safe to trade, audited, or endorsed. DexScreener makes no claims about the project behind any token that appears on their platform. The how to verify a Solana token guide covers what actual trust signals look like.
- This article covers the SPL Token Program (
TokenkegQfeZyiNwAJbNbGKPFXCWuBvf9Ss623VQ5DA) metadata path. Tokens using the Token-2022 program (TokenzQdBNbLqP5VEhdkAS6EPFLC1PHnBqCXEpPxuEb) may have different metadata handling. The metadata update flow for Token-2022 tokens with extensions is out of scope here. Likewise, EVM-chain tokens on DexScreener use a different metadata system entirely. - Update authority revocation is irreversible. If you revoked update authority on your Metaplex metadata account — a common step in trust-signal checklists — you cannot update the metadata URI afterward. The metadata is frozen permanently. Check authority status before assuming you can fix a broken URI post-launch.
Things readers ask
What is the DexScreener Enhanced Token Info block?
Enhanced Token Info is DexScreener's populated metadata block — logo, description, links to Twitter/Telegram/Discord/website — that appears on your token's pair page once DexScreener has indexed and accepted your Metaplex metadata. It can appear organically after DexScreener crawls your on-chain metadata, or you can trigger it faster via DexScreener's paid Update Token Info form (fee approximately $300 in SOL, though DexScreener varies this). Your token must have an active trading pool to appear on DexScreener at all.
How much does DexScreener Update Token Info cost?
DexScreener's Update Token Info fee is approximately $300 in SOL at time of writing, but DexScreener does not publish a fixed price and the amount changes. Verify the current fee on dexscreener.com before submitting. The fee is non-refundable — a rejected submission is not reimbursed. Double-check every metadata field before paying.
Which Metaplex metadata fields does DexScreener read?
DexScreener reads 6 fields from your Metaplex token-metadata account: name, symbol, image (the URI pointing to a PNG or SVG), description, external_url, and the extensions object. Inside extensions it reads 4 sub-fields: twitter, telegram, discord, and website. All 6 fields plus their sub-fields must be populated and resolvable at index time for the Enhanced block to render fully.
Why was my DexScreener token info update rejected?
Common rejection causes: image URI is unreachable at review time (IPFS gateway timeout), the image file exceeds 1 MB, the description runs over the observed ~200 character limit, social links include redirects instead of direct URLs, your pool TVL is below the observed ~$500 indexing floor, or your Metaplex metadata account still points to a broken or non-HTTPS URI. Revise the specific field, update your on-chain metadata, and resubmit — but pay only after confirming all fields resolve correctly.
Does the DexScreener Enhanced Token Info badge mean the token is verified or audited?
No. Enhanced Token Info means DexScreener has indexed your token's metadata and can display it — nothing more. It is a display upgrade, not an endorsement, audit result, or safety signal. DexScreener does not vet the project behind the token, assess the team, or review the smart contract. A token with a fully populated Enhanced block can still be a failed project. Treat it as a metadata completeness signal, not a trust seal.
Citations
- Metaplex — Token Metadata standard and account structure
- Metaplex — Update instruction for metadata accounts (UpdateMetadataAccountV2)
- SPL Token Program — Token-2022 extensions overview
- Solana Docs — Accounts model and program-derived addresses
- Solscan — BONK token mint (100T supply, 5 decimals, metadata reference)
- Solscan — WIF token mint (1B supply, 6 decimals, metadata reference)
- DexScreener — BONK live pair page (Enhanced Token Info example)
- Pinata — IPFS hosting and dedicated gateway documentation
- Phantom Learn — Token visibility and indexing behavior
- GitHub — mpl-token-metadata source (Metaplex Foundation)
- GitHub — Token-2022 program source (solana-labs)
- CoinGecko — BONK market data and circulating supply (metadata read reference)
- Birdeye — BONK on Birdeye (second indexer metadata reference)
- Messari — Token metadata standards overview in Solana ecosystem
Related Topics
More guides covering the same Solana token creation, mint authority, LP burn, Raydium liquidity, and memecoin launch topics.
Get Token Verified on DexScreener: The 2026 Guide
How to get your token verified on DexScreener — the orange checkmark, DEX Paid badge, and Boost mechanics explained. Costs, submission steps, and rejection reasons.
How to List a Token on DexScreener (Quick Guide 2026)
DexScreener auto-indexes any token with a live DEX pool — no manual submission. Learn how DexScreener listing works: prerequisites, timeline, next steps.
Transfer Mint Authority on Solana: Move vs Revoke
Transfer Solana SPL mint authority to a multisig instead of revoking — when each is right, SetAuthority mechanics, common pitfalls.
Solana Burn Wallet: What It Is, How to Verify
The Solana burn wallet (1nc1nerator) explained: what it is, why tokens sent there are gone forever, and how to verify any LP or supply burn on Solscan.
DexScreener vs CoinGecko: Which to List On First (2026)
DexScreener vs CoinGecko compared: auto-index vs manual review, cost, timeline, audience, and the right order to list your Solana token on both.
How to Airdrop Solana Tokens (Step-by-Step 2026)
Complete walkthrough for airdropping SPL tokens on Solana: wallet CSV prep, batch limits, cost per send, and when an airdrop helps vs. hurts your launch.